Thursday, April 5, 2012


It’s that time or year again, well almost that time of year again, when one of my most favorite flowers ever pops up from the ground and blooms its beautiful, funky, purple self. Every Fall I plant more Allium bulbs, knowing that my Spring will be so much the better for it. When I see the first signs of their bright green leaves emerging from the cold, Spring ground, I am like a small child on Christmas morning.

  There are many, many different varieties of allium (otherwise known as the onion family) but my two favorites are Allium Giganteum (giant allium ) and Allium Globemaster. Both display brilliant, puffy globes of purple in May/June; when planted in large numbers the effect is spectacular.

In honor of my flower bestie, I try and paint a few Allium paintings each Spring. I start by understanding the form of the flower. Hundreds of tiny, tiny spokes jut out from one central point, creating a sphere of stems; on the end of each spoke/stem is a tiny purple flower. Side note: If you haven’t stared into the trippy depths of an allium puff, I highly recommend it. Life changing.

I then do my best to mimic this spherical perfection onto my canvas. I love painting the purple allium on a backdrop of bright orange- I use gauche to get this brilliant hue. This allium painting was created using acrylic paint, gauche and colored pencil.


       And a close-up Allium....


  * Like this? You can reserve one of this Spring's allium paintings! Email me at rvelladesign@gmail.com for more information.

Monday, February 13, 2012

Tree Skirt.

 I take the shapes and forms I observe in the natural world and bring it all inside to my studio. The earth's wisdom informs my art. That is why being a gardener and artist is a perfect combination. While most of my studio time is spent creating mixed media paintings, I also love to make clothing. Clothing is three dimensional, it's functional and I find it can capture amazingly the inspiration I receive from my time spent outdoors.

 I created this skirt to blend amongst the trees. As a little girl, I used to climb high into the branches of a giant hemlock in my woods, sitting for hours reading books and watching the squirrels. To this day, I find immense peace surrounded by branches and foliage. This is probably why I instantly loved the Roman myth of Daphne and Apollo. To avoid Apollo's aggressive advances, Daphne runs fast through the forest, eventually turning herself into a tree so that he can never own her. I can imagine Daphne's feminine form zipping through the forest and then slowly morphing into the swirling trunk of a tree, pissing off the powerful Apollo. Something about this image deeply appeals to me. Maybe it's the idea of graceful femininity triumphing over aggressive masculinity. Maybe it's the idea of running buck wild through the woods, escaping what we don't want. Or maybe I want to be a tree. Who knows.

Regardless, here is my Daphne tree skirt, inspired by the trees and Roman myth. I made it from crocheting square of different greens, backing them with a shiny brown material, and then layering them like leaves. The skirt closes in the back, corset style, with a green ribbon. Swirling, crocheted green tendrils hang from the waist of the skirt like vines.

Tuesday, January 24, 2012

Trees, Spirals and Moon.

It's winter, the gardens are sleeping, the ground is frozen, and I am busy indoors creating nature inspired artwork. 

Here is a recently completed mixed media painting commissioned by my dear friend Charlene. 

I created this piece using acrylic paint, colored pencil, paper and dye. The circles, swirls, and vines are created by tearing tiny pieces of colored paper and adhering them, mosaic-style, to the canvas with modge-podge or matt medium. Although tedious, I love this technique and use it in almost all my artwork. Sometimes I purchase colored paper, but usually I recycle paper scraps and dye, paint or color the paper to a specific color. A few years ago I saved a bunch of my receipts and dyed them all bright yellow using dye made from the spice turmeric. The owl's eyes in this painting were created using small pieces of these dyed receipts. There is also plenty of brown bag, tissue paper from gift boxes and fabric scraps recycled into this painting.

On the lower left of the painting, beneath the layers of paint and paper, reads this:

"Know that you carry the wisdom of the earth." 

It's true, you do. 


"Then draw near to nature." ~ Rainer Maria Rilke

Sunday, September 4, 2011

End of Summer at Vella Gardens

      With the shortening days and the dropping temperatures, Vella Gardens is gracefully transitioning away from Summer and showing the beautiful signs of a quickly approaching Fall. We are busy harvesting the rewards of the season's bounty and getting the cottage ready for some fun Fall events.

                                        Organically grown flowers, vegetables and herbs.


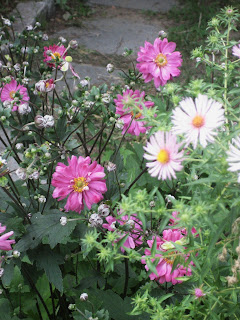
 Two of my favorite Fall blooming perennials, Japanese Anemone and Aster, are making an appearance.
  Even this late in the season, the warm temperatures of the greenhouse are allowing me to grow purple basil and calendula seedlings. The chives and sedums seem to like the warmth too.

   The cooler days and even cooler nights make the Swiss Chard and other greens extremely happy. Now is a good time to replant cool weather lovin' greens like spinach, lettuces, chards and kale.


My pumpkin patch has created some little organic pumpkins. I love them. I bet you do too. In order to ensure that the pumpkins will keep until Halloween, they must be cured at warm temperatures and then stored in a cool, dry space. Per the advice of my farmer friend, keeping the pumpkins out in the sun for a week does the curing trick.

   Other exciting news: Starting Saturday, Sept 24, the lovely Nikolai Blinow will be teaching a 6 week, outdoor yoga series on the chakras. Classes will be held at Vella Gardens, from 10:30 until 11:00 am at 1 Alfred Stone Rd. in Pawtucket. The series will be designed so that students who come every week will build on their understanding, yet will also be conducive to those who can only drop-in for a few classes. All levels are welcome!!!                                               

Wednesday, July 13, 2011

What's been happening at Vella Gardens?


       The shasta daisies and day lillies are in full bloom! (Yippee)

     The rows of delicious salad greens are filling in. (Wahoooo)

    The pumpkin plants are loving life. (hells yeah!)

    We are harvesting and hanging lavender bundles. (ahhhhhh)
                                
 Organic herbs (Oregano, thyme and peppermint) are being potted for wholesale. (Whoop whoop)


   And the Art and Earth Wellness Studio- a space for massge therapy, bodywork and natural health is slowly but surely being created!!!! (Ommmmmm)

  http://www.rtalierciomassagetherapy.com/


Sunday, June 26, 2011

Sunday Night Jam Session

 Making jam is a fantastic way to preserve your summer harvest for the bleak winter months. I've been picking strawberries and blackberries from the garden and decided to turn them into jam. Sunday night at 9 pm- perfect time for a berry jam session. Obviously. Here's how.

YOU NEED:
- 5 Cups of mashed berries- so about 7 or 8 cups of whole berries
- 8 Canning jars (with two part lids)
- Canning pot
- 7 cups of Sugar
- 1 box of Pectin
- Metal tongs or canning tongs.
- Jam music!


1) Gather your berries. You'll need 5 cups of mashed berries to make jam, so thats about 7 or 8 cups of whole berries. In my case, I used a combination of garden-grown strawberries and blackberries- and since I was short about a cup I ran out and bought a pint of local, organic strawberries to make up the difference.

2) Put your Pandora station on Grateful Dead radio, or another appropriate jam session station. Hopefully your first song is a live version of Shakedown Street by Phil Lesh, because that song kicks ass and has a great berry mashing beat. Seriously.

3) Fill a canning pot about half -way with water and bring it to a simmer. You'll need this hot water bath for the very end of the jam session.


4) Wash out the jam jars. Unscrew the lids and wash the jars and lid rings with soap and hot water. Place on a clean surface to dry. Take the lid caps, put in a saucepan and pour boiling water over them. Let them hang out in the hot water until you need them.


5) Mash you berries. A potato masher will suffice. I used some strange ladle-like device because I couldn't find my potato masher. You can also use a food processor but DON'T puree. There should be plenty of berry pieces in your berry mash.

6) Measure out 7 cups of sugar and put aside. I know, 7 cups of sugar is kind of gross, but you need this exact sugar - fruit - pectin ratio to ensure that the jam sets safely.

7) Put 5 cups of mashed berries into a saucepot. Make sure the measurement is exact. Start heating on medium heat.


8) Add one box of pectin and start stirring. Stir until the mixture reaches a rolling boil. A rolling boil is a boil that can't be stirred down.


9) Quickly add the sugar. Keep stirring continuously until the mixture again reaches a rolling boil. Once it does, stir for one more minute and then remove from heat.

(Things start to get a little hectic at this point. The background jam music is crucial here to keep you moving.)

10) Ladle the jam into the jars, filling until about 1/8 inch below the top. Wipe off any jam that might have dripped onto the top of the jar and then put on the lids, turning tightly.

11) Using your tongs, lower the jars into the canning pot full of simmering water. All the jars need to be covered by at least 1 - 2 inches of water, so if there isn't enough, add boiling water to the pot.

12) Bring to a gentle boil and keep the jars in the pot for ten minutes.

13) Remove the jars from the pot and place upright on a towel to cool.


14) After the jars have cooled, check each lid by pushing on the center. If the lids pop back at your touch, the jar has to be refridgerated- it hasn't set correctly. Otherwise, you are safe to keep your homemade jam on a shelf until you are ready to eat it. The National Center For Home Food Preservation recommends using the jams within a year.

15) Scrap the bottom of the saucepot for the jam remanents and put on a piece of toast. Rouse your roommate who is resting nicely in her bed and make her try your AMAZING BERRY JAM!!!!


It Takes a Village to Start an Urban Farm.

    The to-do list for opening Vella Gardens seem endless- starting a nursery/urban farm/retail space/center of creativity and wellness and all things Mother Earth is no small task. But for now, even though it's late in the farming season, I've been focusing on cleaning up the outdoor space and turning it into the urban farm I've been dreaming of for years.

I'm trying to grow on land that used to host a greenhouse- its a long rectangle plot enclosed by an old foundation on one side, a chain-linked fence on the other and a wooden gate at its entranceway. After the greenhouse roof was dismantled about 50 years ago, the lot remained empty until quite recently, when the last business owner at 1 Alfred Stone Rd. turned it into an outdoor retail space for her perennials and annuals. She cleaned up the lot and erected a beautiful, wooden pergola.

                                         The space when I first saw it, abandoned for several years.

                                          I, however, want to take things one step further.

 When I first saw the space, I immediately envisioned reclaiming the land and using it to GROW. I envisioned rows of perennial flowers blossoming a rainbow of colors. I saw pumpkin vines and oregano leaves and hardy kiwi fruit vines growing up the peregola. I saw rows of lavender, mint, thyme and chives. I envisioned a space in the center of the lot, underneath the pergola, for sitting in meditation, for listening to live music or for guest speakers to come and share their wisdom.

And so, I got to work. Weeding. Before I could even begin to map out my vision, I needed to weed. But as I started digging in the dirt I began finding shards of glass everywhere. I mean, e.v.e.r.y.w.h.e.r.e. Reminents of the old greenhouse roof.

               I realized 1) Urban farming is not for sissies. 2) I needed raised beds. 3) I needed help.

                                                   Buckets full of glass I've picked up from the land. 


 I quickly enlisted the help of my family and friends and scheduled a family work day. My brother and Dad came to use their technical brains to engineer several raised beds for planting my vegetables and greens.


  My mother wasted no time, putting her amazing cleaning abilities to work weeding the gardens and giving the store a good scrub down (my mother is able to see dirt particles not visible to the human eye). She even got her hands on a wheel barrow.

                                         
My best bud Charlene and my roommate Katie arrived to help haul and spread a dump truck full of soil/manure delivered by Al. Because it's late June, this was my last chance to put in a pumpkin patch. Katie was especcially skilled with shaping the dirt into even beds for the pumpkins.


And my boyfriend, the talented Chef Jason Armitage, came over for a few hours on his day off to show us all up with his wheel barrow/dirt moving skills.


By the end of a very long day, we were exhuasted, filthy and smiling. Our bodies ached but we were filled with the great satisfaction that comes from a day of good, solid, productive, hardwork. We had succesfully created beds for a beautiful pumpkin patch, wooden frames were erected for vegetables and herbs, and we cleaned out a dump truck full of weeds and debris from the plot. Things were shaping up.

                            The back of the space was cleaned up and turned into rows of beds for a pumpkin patch.

I'm realizing how much community is linked with farmingFrom the farmer who delivers compost made by local cows, to the friends and family who pitch in their man/woman power, to the neighbors and passerbys who stop by to offer support and advice. And of course the local people and restaurants who recognize the importance of eating locally grown food and whose support makes the whole thing possible. Yes, it definitely takes a village. And It's suprising, but people jump at the opportunity to volunteer their time to garden or farm, probably because getting to spend a day outside with a group of happy people and using our bodies in a productive way is a treat in this modern world. And that's a good thing for me- because growing food is not something that I could easily do alone.


    My goal is to run Vella Gardens as a small CSA next season, offering vegetables, herbs and perennial flowers. If you are interested in learning more about buying a share next season please contact me at: rvellladesign@gmail.com